welcome

Earning world

Sunday, December 26, 2010

How to start a multilingual site?

You would have always thought of creating one or several sites in different languages for the people of different countries . Let's say you want to start a technology site in Europe, and you want to offer your content to Japanese, German, and Spanish speakers. The major factors to keep in mind are site structure, geographic as well as language targeting, and content organization.

Site structure
The first thing you'll want to consider is if it makes sense for you to buy country-specific top-level domains (TLD) for all the countries you plan to serve. So your domains might be ilovebackpacking.co.uk, ichlieberucksackreisen.de, and irdemochilero.es.es. This option is beneficial if you want to target the countries that each TLD is associated with, a method known as geo targeting. Note that this is different from language targeting, which we will get into a little more later. Let's say your German content is specifically for users from Germany and not as relevant for German-speaking users in Austria or Switzerland. In this case, you'd want to register a domain on the .de TLD. German users will identify your site as a local one they are more likely to trust. On the other hand, it can be pretty expensive to buy domains on the country-specific TLDs, and it's more of a pain to update and maintain multiple domains. So if your time and resources are limited, consider buying one non-country-specific domain, which hosts all the different versions of your website. In this case, we recommend either of these two options:

  1. Put the content of every language in a different subdomain. For our example, you would haveen.example.com, de.example.com, and es.example.com.
  2. Put the content of every language in a different subdirectory. This is easier to handle when updating and maintaining your site. For our example, you would have example.com/en/, example.com/de/, andexample.com/es/.
Matt Cutts wrote a substantial post on subdirectories and subdomains, which may help you decide which option to go with.

Geographic targeting vs. Language targeting
As mentioned above, if your content is especially targeted towards a particular region in the world, you can use the Set Geographic Target tool in Webmaster Tools. It allows you to set different geographic targets for different subdirectories or subdomains (e.g., /de/ for Germany).

If you want to reach all speakers of a particular language around the world, you probably don't want to limit yourself to a specific geographic location. This is known as language targeting, and in this case, you don't want to use the geographic target tool.

Content organization
The same content in different languages is not considered duplicate content. Just make sure you keep things organized. If you follow one of the site structure recommendations mentioned above, this should be pretty straightforward. Avoid mixing languages on each page, as this may confuse Googlebot as well as your users. Keep navigation and content in the same language on each page.

If you want to check how many of your pages are recognized in a certain language, you can perform a language-specific site search. For example, if you go to google.de and do a site search on google.com, choose the option below the search box to only display German results.

If you have more questions on this topic, you can join our Webmaster Help Group to get more advice.

CLEVER WAYS TO CONNECT VIA VOICE & THE WEB

Few of the smartest ways to connect via voice & web are :-


1). Gmail labs :- Visit the labs option in the settings of gmail to access cool things such asoffline gmail & gmail tasks. It works in Internet Explorer 7.0 or later, firefox 2.0, Chrome, Safari 3.0 & higher.


2). Affixa Download-- The affixa downloadsets your email program such as gmail or yahoo mail as a windows default for quick & easy handling of mailto: links & file attachments .


3). DeferredSender -- Suppose you finished a big report at 3 AM but u don't want your boss to know how late u stayed awake? Keep up the appearance of professional cool by using the Deferredsender (registration required) a service that delivers email messages exactly when u want them sent.


4). Postbox-- If your inbox is packed, with attachments try postbox a downloadable desktop email application thats chokefull of awesome tools for organising messages & attachments alike.


5).Skype 4.0 -- While you are on business trips u can see & talkwith loved ones easily via the skype 4.0 Voip download, which offers improved video & sound quality.


6). TrapCall -- The simple "TrapCall" service (registration required) shows the number behind virtually any call. TrapCall reveals the phone number for any blocked call that u get.


How to create your first website?

Publishing Your Site

Step1
Your Web host ISP may have its own system for uploading pages. Otherwise, obtain a File Transfer Protocol (FTP) program. Any will do.

Step2
Open your FTP program and log in to your host server by entering your login name and password.

Step3
Access the directory where your home page belongs. (Your Web ISP will give you this information.) The directory address is usually in the form of /pub/username, /pub/www/username or /pub/username/www. Your FTP program and host server will have specific instructions on how to access your directory.

Step4
Upload each page and graphic of your site according to the specific instructions of the FTP program and your host server.

Getting Started

Step1
Choose an ISP to host your Web site.

Step2
Investigate several hosting services, considering factors such as maximum space, accessibility, reputation and terms of service.

Step3
Select and download a Web-page editor. Several simple editors are available for free; Netscape Composer is one. These editors let you see what your site will look like as you build it, so you won't have to learn HTML or other programming languages.

Step4
Your Web-page editor will give you specific instructions about options such as naming your site, creating different sections, creating backgrounds, adding links and inserting images.

Using Images

Step1
Create images for your site by drawing them with your computer's paint program or by using a scanner for photographs and other hard-copy images.

Step2
If you find an image on another Web page that you'd like to use, e-mail the page's owner or administrator and request permission to download and post it. Download an image from a Web site by right-clicking on it (or clicking and holding on a Mac) and selecting Save Picture.

Things You’ll Need:

  • Modems
  • Scanners
  • Internet Service Providers
  • Adobe Photoshop
  • FTP Programs
  • Macromedia Dreamweaver
  • Microsoft FrontPage
  • Microsoft Word
  • Netscape Composer
  • Paint Shop Pro
  • Clip Art CD-ROMs
  • Scanning Software
  • Paint Shop Pro

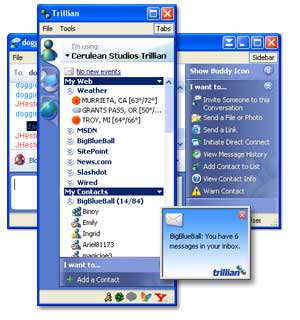
Connect to multiple IM networks through one application

Being in touch with friends has always been a good thing. Installing 5 instant messaging(IM) applications so as to connect with all of them will not be a good thing due to the RAM usage that follows.

The trillion instant messaging application supports connecting to multiple IM networks. That way a user could be logged on to MSN, YAHOO, GTALK, ICQ, SKYPE, etc. all from same application.
The amount of Ram you can save by doing so is unbelievable—about 3/4rth of system memory is saved that is otherwise consumed by multiple IM applications.

ASTRA is th 4rth version of Trillion, currently under controlled beta testing. After a free registration. You get access to the application only to the free version. Though( the PRO version costs some money). Besides the features you would expect of a good IM client, trillion also support logging chats, skinning and looks really good.

If you have multiple accounts on the same network (such as 2 accounts on MSN messenger), you can be logged in to both at the same time using Trillian. Notifications are also available to email accounts, Twitter, Facebook & Myspace IM.

Whats new in Windows Vista?(Windows Sidebar)


Windows Sidebar

The concept of widgets has been around in one form or another wherever operating systems were to be found –be it the unixes or the windows ,or indeed the Macintosh environment . Under Windows, Stardock
Had long ago introduced a concept quite similar to the now prevalent widgets. Vista introduced the sidebar under the then – codenamed longhorn build released in September 2002. While many have suggested that vista borrowed the idea from konfabulator (now yahooEngine )or from Apple’s Dashboard ;it is interesting to note that both these programs were introduced after September 2002.What then is a widget ?The simplest explanation is that it is a mini-program –one stripped to the most rudimentary features. For Vista’s implementation of the widget concept ,we can think of them as simple tools written in HTML/XML.markup languages,
The windows sidebar is a simple panel that gathers several of these widgets –which are called Desktop Gadgets under Vista – in to a single interface element..The windows sidebar is essentially meant to display quick information on various aspects of your social or online life . For example , a Gadget might be used to display RSS feeds off your favourite web site , another to display the latest e-mail, yet another might visually show the phases of the moon , while one might be used to track and show ticker prices on stocks . These Gadgets can reside on the sidebar or as free floating elements on the Desktop ; The sidebar itself can be placed at various placed around the Desktop , it is even multi monitor aware and can be placed on a second monitor if realestate is prime on your primary display , All in all , the windows sidebar is a nice addition to the operating system . 
. 
Head to http://gallery.live.com/ to browse through an already –impressive array of Desktop Gadgets.

Screenshot in Windows XP and Vista

You can take the complete screenshot of the computer screen that you are working on . It could be used in many ways , like to just send a snapshot of the work you are doing to some one or while asking query you can presentthe actual screen that is being displayed. Taking screen shots could be fun also to set up "Dummy desktops " or "Ghost desktops"

How to take Screenshot in windows XP ?

1. Press Printscreen Button on the top right side of your keyboard .
2. Open Microsoft Paint New file - To do this, click Start > All Programs > Accessories > Paint. Click inside the white part of the screen
3.On the Edit Menu Press Paste or just press Ctrl V.
4. Click File > Save As. In the box that pops up, change the "Save As Type" to PNG or JPG. Type in a filename for your image. Choose a place to save, like the Desktop, and click save.
5. Thats it , a screenshot has been taken and you can send it to your friends by attaching it with the email .That acts as a regular jpeg or PNG file .

How to take Screenshot in Windows Vista ?


1. In Microsoft Vista (except in Home Basic), there is a tool called the Snipping Tool to take snapshots .
2. Go to Start Menu , click on run and Type snip in the run window .
3. The Snipping Tool gets open .You could choose from various masks in the 'New' button like free-from snip, rectangular snip, window snip, or full-screen snip. 
4. In free-form snip mode, select the area you want to be captured. In rectangular snip mode drag a rectangle to take the snapshot. For window snip mode, select the window you want to capture. In full-screen mode, just selecting it from the drop-down menu makes the capture. 
5. The snipped image is then opened within the Snipping Tool, and is also copied to the Windows clipboard for use in other applications

Open Windows Explorer with Single Pane


When you use [Windows] +[E] to open a Windows Explorer window, it opens in the two-pane layout.To have it open within a single pane by default, do the following :
In the Registry Editor, navigate to


HKEY_CLASSES_ROOT\Folder\shell\explore\ddexec


Double click on the (Default) and change the string to
[ ViewFolder (“%1” , %I, %S) ] (including the brackets )


To revert to the double pane window, set (Default) to
[ ExploreFolder(“%1” , %I, %S) ]

Google Checkout


Google Checkout is an Online Payment system.When shopping online,going through the routine of filling up a registration form and getting a demand draft or check issued is painful.An online payment system eliminates the need for that routine.When registering for such a service you provide information regarding yourself and your bank account and credit card to the service provider.The next time you shop in you need to log in to your online payment account and you are taken to the payment providers siteto confirm the payment.The merchant and the service provider do the rest behind the scenes. The product also gets on its way to you faster.
Online payment systems usually charge the merchant tranaction include a fixed charge and a percentage of the transaction value.In return by including an online payment system on their site,merchants can hope to attract people who prefer the convenience of such payment process systems.The present king of hill by far in this market is PayPal,now an ebay subsidiary.Google’s foray in this market is Checkout.
GCK(Google Checkout) only caters to individual to business transactions.This service is not yet available in India.
BUYERS
Users planning to use GCK for their purchases need to provide a credit card number,besides a residential address,at the time of sign up.There are no fees associated for using GCK for purchasing online.GCK keeps track of all the transactions conducted by the user so a purchase history is easily available.GCK does not reveal card detailsto merchantsand if the user so desires even the mail id is with held.Also is allows users to rate the merchantsthey purchased from.This rating is maintained independent of the merchants site.and so allows other users to form unbiased opinions.GCK offers the user protection from credit card theft in case unauthorized purchases are made on the credit card.
MERCHANTS
Merchants who want to offer the service are provided with the javascript code that needs to be inserted into their site.The link provided in the code takes the visitor to the GCK page where the details of the payments are to be made out.GCK charges $.20 plus 2 percent of the transaction value as fees.By offering discounts to the members of its AdWords Programme,Google offers some incentives to sign up for GCK.An investment in ADWords allows free transactions upto 10 times that in GCK.So a merchant who has invested $ 10 in AdWordsis not levied any transaction fees for transactions upto $100.Other ways in which GCK helps merchants is by putting up an icon in their ads.People who can see the GCK iconin the site’s ads can be a assured that GCK is providing the payment service.This helps the GCK supported site’s ads to stand aprt from other ads.Besides that GCK helps the merchants fight buyer fraud, asituation where buyers claim that the product they received is not as described.
LIMITATIONS
GCK is presently available only in the US.Unlike PayPal it is not possible to transfer money between individuals.GCK only allows transfer between merchants who have registered at GCK and users.

GOOGLE HELLO


After Google Talk ,Hello is another instant messaging (IM)service by google with a different take.It is an application for sharing digital images with friends –no websites and no email required to share your photos with Hello.The only requirement is that both the sender and the receiver need to have the Hello program installed.Get it at www.hello.com.


You can share photos with your friend while chatting –no resizing the high quality photos or wasting time waiting images to upload.Blogger users can also upload photos and add captions directly through Hello.It has also Bloggerbot which is in your buddylist and directly uploads photos to your blogger blog.At present Hello only supports JPEG files.

You can images using IM and simultaneously add comments and chat with your friend.The receiver will receive images in a few seconds depending on the speed and then the images can be saved or printed.
Hello’s only drawback is that you cant share pictures with more than one user at the same time.But it can be used with or without picassa.Your photos and chat are secure as the application connects you by peer to peer networking even when your firewall is on.All chats and photos transferred are protected with 128 bitadvanced encryption Standard (AES) encryption
Smiley and Fun shortcuts
Np= No Problem
b= Bye
c=Cool
h=hi
k=Ok
brb =Be Right Back
ty=Thanks
l=LOL
n=No
y=Yes
bfn=Bye foe now
md= most definitely
When images are sent Hello optimizes them for quick transmission.Received images are stored in the My Pictures folder by default,but you can change this if you want.You can drag and drop images from any folder with windows explore and Picassa albums.While you chat you can also see which photo your friend is currently viewing,thanks to a small pop up window above the filmstrip on the right.
BloggerBot is a kind of Gateway by which images with captions can be post directly on your Blogger Blog.Clock BloggerBot in your friends list and you will reach the Blogger Home page.So you can log in your Blogger blog and manage your photos directly.


So friends try out Google Hello.

Google Groups


Google Groups is a free service for communicating ,discussing and sharing ideas through email or at the website.You can create ,manage or browse groups to seek or give opinions,advice,resources or information.Like several other group sites on the net it has all the basic features –search for topics on your interest or browse for information posted on the groups.
On Dec 2 ,2004 Google launched Groups Beta with a new look and improvements over the earlier groups.The new Beta enables mailing lists and public discussions .You can bookmark topics that interest you and receive replies on starred topics on your group page.To log in and sign for groups all you need is a Google account.Each group has its own email address so that members can get updates and stay in touch with the group.

Create and Manage your Group
1.Set up a group by filling in relevant information and selecting the access level(public announcement only or restricted).
2.Add members either directly or by sending an invitation to join the group.

Group settings
Your group settings can be edited any time-
1.General
Group name ,Description,Web address and Group email
2.Appearance:
You can change the look of your group to one of the nine optionsand customize the fonts and colours of the sidebars.
3.Access Rights:
any changes you might want in members access rights can be made under this menu.
4.Navigation:
The navigation order and visibility of the group connections are customizable .If you have public access to your group,you can hide the member list by clicking on the Hide next to it on the page.The subsections can be renamed from here.
5.Categories :
Selection of a category for your group is made from this option.Select a category by topic or region.If your choice is not listed you can search from the search box.
Advanced :
Advanced options include selecting a primary language for the group and deleting the group.The group can also act as a remote archive for the mail lists hosted on other services.


Groups settings help customize the functioning of the group activities according to the options selected.Management tasks below Group settings on the menu bar help in the management of pending messages and members of the group.You can also edit your membership in the group,in which you can edit your e mail settings and your nickname in the group.
Search for a Group
If you are looking for a group on a particular topic,region,language,activity level or number of users ,you can use the group Directory.Google Groups includes the Usenet newsgroups each of which has subgroups .Such Groups and Subgroups are separated by a fullstop for instance comp.windows.vista.Here “comp” is the group, “windows” is the subgroup,and “vista” is the topic for which that particular group was created .

In conclusion


Groups are communities created by and for people with similar ideas and tastes and for sharing information and resources,Posting messages ,searching ,customizing group pages and browsing groups have improved under Google Groups Beta.